Level Envelope
Overview
A Level Envelope (sometimes referred to as a Volume Envelope) consists of a set of Level Points, with each Level Point nominating the required device levels for the cue at a specific time. If you nominate fade-in and/or fade-out time, then SCS sets up level points for the fade-in and/or fade-out. Level points created between fade-in and fade-out are referred to as 'standard' level points.
'Standard' level points are available with SCS Professional and higher license levels.
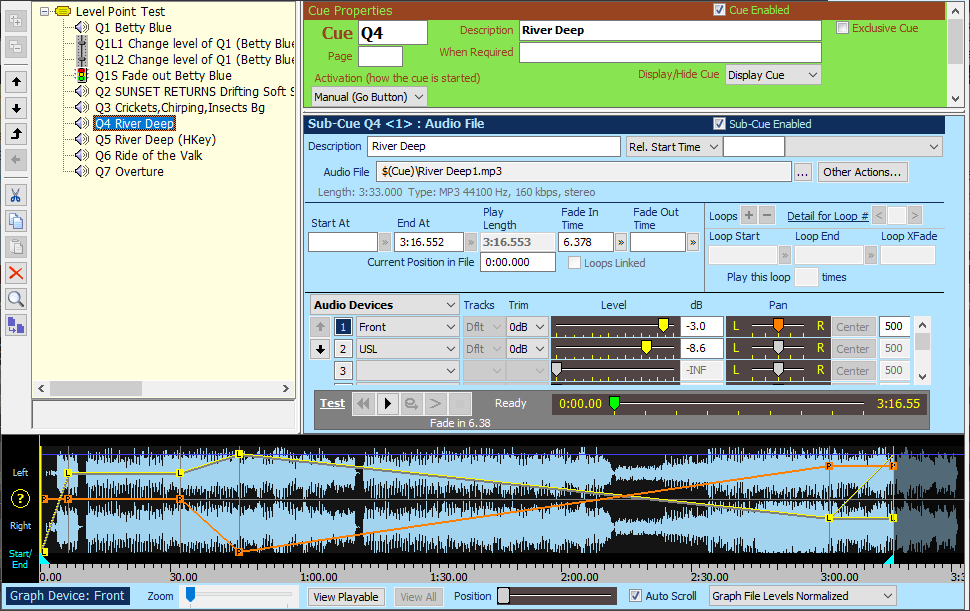
Here's an example of a cue containing level points:
The audio graph currently shows levels for the 'Front' audio device. You can show the graph for a different device simply by clicking on the relevant device number (eg '2') or by clicking on any control for that device (eg the 'Level' control).
The Horizontal light blue line show the 'Level' for that device, which is -3.0dB in the above example.
A Level Point comprises a relative dB level and (if the output is stereo) a pan setting. For example, a relative dB level entered as +0.0dB would play (in the above example) at -3.0dB. So if you adjust the overall level for the device (in this cue) then playback level all level points will automatically be adjusted. (The level points will retain their entered relative dB levels.)
Level point markers on the audio graph show the Level (L) and Pan (P) settings.
The first level point is at the start of the cue, and because this cue has a fade-in time specified, the starting level is -INF and cannot be changed. (If you do not have a fade-in time specified than you can change the starting level.) The pan setting is 'center' but you can change that if required.
The next level point is a 'fade-in' level point at 6.378 seconds. This has a relative level of -6.3dB, and the pan setting is 'center'. (Although you cannot specifically see those values in the above screenshot, you would be able to see and adjust them by selecting Level Point: Fade In from the Audio Devices drop-down list.)
The third level point is a 'standard' level point at 32.365 seconds. This level point has been set to the same relative level as the preceding level point, ie to -6.3dB, pan center. So the playback level for this device stays constant between the end of the fade-in and this level point.
The fourth level point is a 'standard' level point at 45.830 seconds and the relative level is set to +0.0dB, and pan is set towards the right. So between the second and third level points the playback level will increase to -3.0dB, and pan will move to the nominated position towards the right.
The fifth level point is another 'standard' level point, at 3:01.824 with a relative level of +0.0dB and a pan setting towards the left. So between the third and fourth level points the playback level will stay constant at -3.0dB, and pan will move to the nominated position towards the left.
The final level point is the 'end' level point, with the same setting as the preceding level point. So the level and pan remain unchanged during this final period of just under 15 seconds.
|
Important information regarding Level Envelopes: As mentioned earlier, 'Standard' level points are only available if you have an SCS Professional or higher license. Due to various logical complexities, a cue containing a loop cannot include 'standard' level points. Level point times are unique within the cue - you cannot have two level points with exactly the same time. For example, if you drag the third level point (in the above graph) to the left, the drag position will stop 1 millisecond to the right of the second level point. The playback level will be capped if necessary, so if you set a relative level of +20dB when the audio device level is -3.0dB then the actual playback level will be capped at +0.0dB (or at +12dB if you have selected that higher 'maximum audio level' in Run Time Settings). The 'minimum audible audio level' used by SCS is as set in Run Time Settings. Any actual or derived dB level at or below this minimum is treated as -INF (minus infinity) and is passed to the underlying software as the internal value 0, which is silence. A Level Change Cue affecting an Audio File Cue with a Level Envelope will cancel processing of the Level Envelope, ie the Level Change Cue effectively takes over from the Level Envelope. |
Level Point Maintenance
Adding a Level Point
To add a level point to an audio graph, right-click on the graph at the approximate position that you require the level point. A pop-up menu (or 'context menu') will appear. In the context menu, select the type of level point you want to add, which may be 'fade-in', 'standard' or 'fade-out'. Menu items disabled imply that the operation is not available. For example, 'add fade-in level point' will be disabled if you already have a fade-in time set (and therefore a fade-in level point).
If you decide you do not want to add a level point, simply click elsewhere and the pop-up menu will close.
If you select a menu item to add a level point then the pop-up menu will close and your selected level point will be added and will be visible on the audio graph. If this is the earliest on only level point then the relative level will initially be set to +0.0dB, but you will be able to change that as explained later. If there is an earlier level point already existing then the relative level and pan of your new level point will initially be set the same as the preceding level point, but you will be able to change that as explained later.
Alternatively, to add a Standard Level Point, just shift-double-click in the graph where you want that standard level point. You can adjust the position, level and pan as described below.
Moving or Changing an SCS Cue Marker Level Point
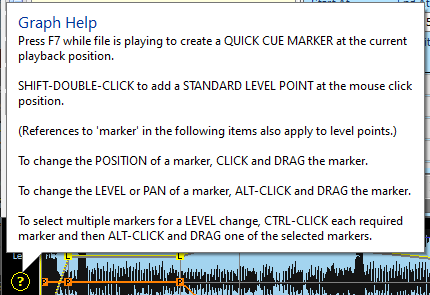
If you hover the mouse pointer over the question mark to the left of the graph, you will see this pop-up:
Changing the Position of a Level Point
To change the position of an existing level point, click and drag the marker to the required position. Note that you can zoom in on your graph if you want to see the wave form more precisely. The limits of dragging are determined by adjacent level points and/or by the start and end positions.
Alternatively, you can set a new position for the level point by right-clicking the level point marker, and then selecting 'set position of this level point' from the pop-up menu. You will then be provided with a simple dialog window in which you can enter the new time for the level point. Note that this time is the time within the file, regardless of the 'start at' time of the cue.
You can undo an accidental movement of a level point by using the Editor's Undo button.
Changing the Relative Level or Pan of a Single Level Point
To change the relative level or pan of a single level point, alt-click and drag the marker. For a level point marker (L) this will adjust the level, and for a pan marker (P) this will adjust the pan setting.
If you have level and pan markers displayed very close together then it can sometimes be difficult to know that you will alt-click on the required marker. For example, you may want to change the level but end up changing the pan. To help alleviate this ambiguity, right-click anywhere on the graph and in the context menu you will see several menu options regarding showing level and pan curves. So if you want to adjust the pan setting you could turn off displaying the level curves and markers.
Alternatively, you can change the relative level and/or the pan setting by adjusting the relative level and/or pan sliders as described below under 'Viewing Level Point Information'.
Changing the Relative Level of Multiple Level Points
To change the relative level of multiple level points, first of all ctrl-click on each level point marker (L) to be included in the adjustment. Then release the ctrl key and alt-click and drag one of the selected level point markers, The relative levels of the selected level points will each be adjusted by the same dB. If necessary, adjustments will be capped. Note that changing the pan settings of multiple level points is not supported - each pan marker has to be separately adjusted. Similarly, you cannot change the position of multiple level points - the position of each level point has to be separate;y adjusted.
Viewing Level Point Information
When you first view the properties for an audio file cue you will see the level and pan settings for each selected Audio Device, as shown in the above screenshot. You will see that Audio Devices is the first entry in a drop-down list (a 'combo-box'). If you click on that drop-down list you can select one of the Level Points shown. When you select a Level Point then the level and pan controls will be changed to show the details for the selected level point. For example:

Level Point Properties and Controls
Audio Device and Tracks: These are display-only when a Level Point is displayed. To add or change the Audio Device and/or Tracks (if available) you need to select Audio Devices instead of a Level Point.
Include?: Clearing an instance of this checkbox enables you to exclude a device from the action of this level point. This is similar to the Include this Device checkbox available in Level Change Cues. You can only exclude devices on Standard Level Points, not on Fade-In or Fade-Out Level Points. See also Include All Devices for Level Points in Editing Options.
Relative dB Levels drop-down list: This list contains three entries: Individual, Synced and Linked. Your setting here applies to ALL level points in this cue.
•The default is Individual, which means that the relative level for each device can be set and changed independently.
•If you choose Synced and you have more than one device entry, then the relative levels of all devices will remain in sync as you adjust the relative level against a device. Note that the Audio Device levels themselves may be different (as shown in the earlier screen shot, where 'Front' has a level of -3.0dB and USL has a level of -8.6dB). So syncing the relative levels does just that - it keeps the relative dB level the same across all devices.
•If you choose Linked and you have more than one device entry, then any adjustment to the relative level of a device will apply the same adjustment to the other devices included in that level point. For example, if Relative dB Levels in the above example had been set to Linked and you changed the 'Front' relative level to -12.3dB (a difference of -6.0dB) then the relative level of the 'USL' device would be change to -28.2dB.
Relative dB Levels: Three fields are shown: (1) the audio device level, (2) the relative level, and (3) the resultant playback level. Only the relative level is enterable. Note that the playback level will be capped if necessary, and if so will be displayed within square brackets, eg =[+0.0].
Pan drop-down list: This list contains three entries: Use Audio Device Pan, Individual and Synced. Your setting applies to ALL level points in this cue.
•The default is Use Audio Device Pan, which means the pan setting for the Level Point will be the same as that specified for the 'Audio Device'.
•Individual and Synced operate similarly to the corresponding Relative dB Level drop-down list settings. There is no Linked setting for Pan as it doesn't make much sense.
Pan: The Pan slider, Center button and Pan Value field are as for any other pan control in SCS. Pan is only available when the selected device is a 2-channel (stereo) device.
Setting a Level Point's Level and/or Pan the same as the previous or next Level Point
If you have changed a level point's level and/or pan and now wish to apply the same settings to the previous or next level point, then right-click on the level point to be changed. You will see menu items for Set Level and Pan same as Previous Level Point, and Set Level and Pan same as Next Level Point. Selecting the required menu entry will apply this change and the graph will be refreshed accordingly. There are also menu items for just setting the level or just setting the pan.
Please note that these menu items affect all devices - not just the currently-selected device. Also, this operation will copy the 'Include?' settings from the associated (previous or next) level point.
Removing a Level Point
To remove a level point, right-click on the level point marker and select Remove Level Point from the pop-up menu.