Lighting Cues
Lighting Cues are only available with SCS Professional and higher license levels. DMX is used for primarily for lighting control.
With SCS Professional you are limited to DMX Channels 1-32 only, and only a single universe. To use DMX Channel numbers greater than 32 you need an SCS Professional Plus or higher license.
Prerequisites
Before you can create a Lighting Cue, you must:
1.Set up required Fixture Types under Fixture Types in Production Properties.
2.Set up a Lighting Device and Fixtures under Lighting - DMX Devices and Fixtures in Production Properties.
|
Note: SCS supports DMX Devices only via the following ENTTEC and FTDI devices (www.enttec.com and www.ftdichip.com): •ENTTEC DMX USB PRO •ENTTEC DMX USB PRO MK2 (This device continues to be supported by SCS but is no longer available from ENTTEC) •ENTTEC OPEN DMX USB •FTDI USB-RS485 cable The FTDI USB-RS485 cable device is compatible with the ENTTEC OPEN DMX USB. Installing the D2XX driver for any of the above devices should install ftd2xx.dll. If SCS cannot find ftd2xx.dll as a loadable library then DMX will not be enabled. Please note: the USB PRO is the preferred device. DMX needs to be refreshed about 40 times a second, and the USB PRO (and USB PRO MK2) handle that refreshing internally. The OPEN DMX USB and FTDI USB-RS485 do not handle DMX refreshing and so for these devices SCS needs to handle the refreshing. This is a processing overhead. |
Overview
Lighting Cues use DMX to control lighting fixtures or dimmers but can, of course, be used to control any other equipment that accepts DMX. SCS generally implements the "tracking" method, whereby once a channel is at a value, it remains at that value until another cue sets the channel to a new value. However, this can be overridden by selecting a different option under Fade out time for other active channels. This will effectively enforce the "preset" method, whereby the cue represents a snapshot of how all DMX values are to be set.
SCS implements "LTP (Latest Takes Precedence)". This means that if you set a channel to a value and then set the same channel to a new value, then the new value takes precedence.
|
Tips for creating a Lighting Cue similar to another Lighting Cue: 1.If you want to create a Lighting Cue (or Sub-Cue) that's identical to or similar to an existing Lighting Cue then you can just use Copy and Paste to create the new cue. 2.However, if you have already created the new Lighting Cue and wish to change it to be identical to or similar to another Lighting Cue, then you can use Copy Properties from another Cue or Sub-Cue. 3.Finally, if you have a lighting plot that you wish to use several times in the show then consider creating a Lighting Cue with an Activation Method of Callable Cue, and then use a 'Call Cue' Cue each time you want to activate that lighting plot. See Callable Cue for details. We recommend Callable Cues be placed at the end of your cue list. |
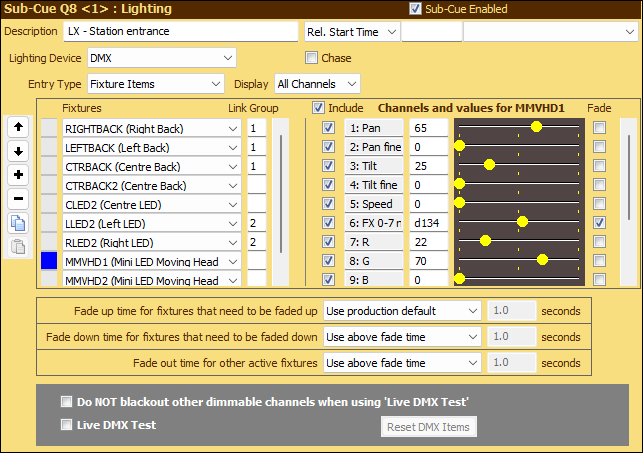
Here's an example of a Lighting Cue:
Properties and Controls
General
Description: Enter a description for this sub-cue.
Rel. Start Time (Relative Start Time): These fields are available for every type of sub-cue. For details see Rel. Start Time under Audio File Cues.
Lighting
Lighting Device: Select a Lighting Device from the drop-down list. See Production Properties - Lighting - DMX Devices and Fixtures for more info.
Chase: Leave this checkbox clear if the Lighting Cue is not a chase. If you do want this cue to implement a chase then select the Chase checkbox. Some additional fields will be displayed. For the revised screenshot and further information see Chase Lighting Cues.
Entry Type: For a Lighting Cue where you want to set specific values for selected Fixtures, select Fixture Items. For a blackout, select Blackout. You can alternatively select DMX Items which enables you to use the pre-SCS 11.8 method of entering DMX values, eg "PAR1,PAR2:1@20,2-3@25, PAR3:1@100". See Lighting Cues - Pre SCS 11.8 for more info on DMX Items. Other Entry Types are DMX Capture Snapshot and DMX Capture Sequence, which enable you to build a Lighting Cue using DMX values captured either as a snapshot (single instance) or as a sequence. See DMX Capture Lighting Cues for details.
If you have Lighting Cues set up using an older version of SCS, then these will only be displayed with an Entry Type of DMX Items.
Display: This control is only displayed for Fixture Items. The default setting is All Channels and will display all channels for the currently-selected fixture. So in the above screenshot, all the channels for fixture MMVHD1 are displayed and can be adjusted. If you change the Display setting to 1st Channels then the next part of the screen will change to show just the first fadeable channel for each fixture. This is particularly useful if you have many single-channel fixtures. Here's an example of how this may appear:
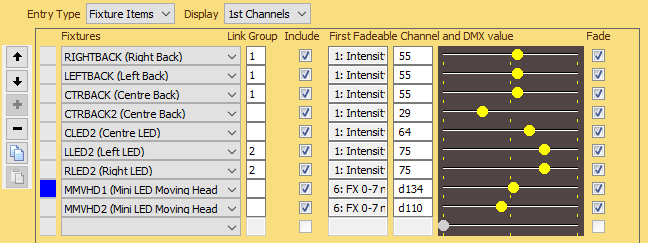
In the theatre used for building this cue, the first seven of the fixtures used in this cue (down to RLED2) were all single-channel fixtures. The last two fixtures shown above were moving head fixtures where channel 6 was an effects channel, were DMX values in the range 8-134 set the intensity. As can be seen in the earlier screenshot on this page, channel 6 is the first (and only) channel marked as fadeable, for this fixture.
Note that the Display setting just determines how the fixture properties are displayed on this screen - it is not a 'property' so does not get saved in the cue file and does not affect the DMX values sent by the cue.
The following properties and controls are display for Entry Type Fixture Items. They are not required for Blackout.
Fixtures
Fixtures: Select the Fixture(s) you require for this Lighting Cue. The Fixtures controls are populated from the fixtures you have set up under Production Properties - Lighting - DMX Devices and Fixtures.
Link Group: This is optional, and if set then causes all the fixtures in the same Link Group to have the same channel values set. If used, it must be numeric in the range 1-9. For example, in the screenshot above the first three fixtures are in link group 1. If the you move the slider for channel 1 (Intensity) for any of these fixtures then that same new value change will also be applied to the other fixtures in that Link Group. All Fixtures associated with a specific Link Group must all have the same Fixture Type. This is to ensure that the relative channel numbers of all Fixtures in the Link Group have the same purpose.
Side-Bar Buttons: The buttons to the left of Fixtures can be used to move individual Fixtures up or down, or to add or remove a Fixture from the cue. Clicking the Copy button will copy all the Fixtures, DMX values, etc for this sub-cue to a clipboard. Clicking the Paste button will replace any Fixtures, DMX values, etc with those currently saved in the clipboard. The Copy and Paste facility is not available for Chase cues, so those buttons will be disabled if Chase has been selected. Note that SCS will display a meaningful tooltip if the mouse hovers over any of the side-bar buttons.
Channels and Values - Display Setting 'All Channels'
The items listed here are for the Fixture currently selected on the left. You can select a Fixture by clicking on the selector button, where indicates the currently-selected Fixture (MMVHD1 in the above example).
Channel Numbers and Descriptions; When you select a Fixture on the left, the details for that Fixture are displayed on the right, with one entry for each channel as determined by the Fixture Type of that Fixture. The channel number and description are shown for each channel. Note that if you cannot see the entire description then just hover the mouse pointer over the field to see a 'tooltip' that contains the channel number and the full description.
Include: The Include checkbox to the left of the Channel Number and Description should be set if the specified DMX value for this channel is to be included when the cue is played. Clear the checkbox if setting the DMX value for this channel is not required in this cue. If the checkbox is clear then the DMX Value and Slider for this channel will be disabled. The Include checkbox at the top of the list (to the left of the word 'Include') enables you to bulk change the Include settings for all channels in the currently-selected fixture.
DMX Value: You may enter the DMX value you require using the text field or you may use the slider. The value in the text field may be a percentage entered just as a number between 0 and 100, or a DMX value entered as DMX followed by a number in the range 0-255, eg dmx230. DMX may be abbreviated to d, eg d230. When using the slider, if the value displayed in the text field starts with d or dmx then the slider will recognize the value as a 0-255 DMX value. If the value displayed is just an integer then the slider will recognize the value as a 0-100 percentage. The slider is useful when used in conjunction with Live DMX Test as it enables you to easily view changes. Note that when the slider has focus then you can make small changes using the left- and right-arrow keys.
Fade: In the lower part of the screen are the fields Fade time up time for fixtures that need to be faded up and Fade down time for fixtures that need to be faded down. If times are selected in those fields then they will be applied against each channel that has the Fade checkbox selected. By default, when adding a Fixture to the cue this checkbox will be selected for each channel identified in the associated Fixture Type as a Dimmer Channel, and will be clear for non-dimmer channels. However, the Fade checkbox is included here so you can override this setting on a channel-by-channel basis. For example, you may want to 'fade' the pan and tilt channels to move the head from it's existing position to a new position. Pan and tilt are not dimmable channels. Although 'fade' is not actually the correct term for this activity, the term has been selected to refer to any DMX value change over time.
Channels and Values - Display Setting '1st Channels'
The items listed here show the first included fadeable channel for each Fixture.
Channel Numbers and Descriptions; The relative channel number and description of each fixture's first included fadeable channel will be displayed here. If there is no included fadeable channel for a fixture then the first channel for that fixture will be shown. Note that if you cannot see the entire description then just hover the mouse pointer over the field to see a 'tooltip' that contains the channel number and the full description.
Include: As above, except that the Include checkbox at the top of the list is not present, as that is a 'fixture-level' include control.
DMX Value: As above.
Fade: As above.
Fade up time for fixtures that need to be faded up: This drop-down list determines the fade up time to be applied to included Channels that have the Fade checkbox selected, where the new DMX value is greater than the DMX value current at run time. The choices are:
•None: No fade will be applied by default, eg if channel 2 is included and has been assigned a value of 59 then when the cue is played SCS will instantly set channel 2 to 59%.
•Use production default: This will use the Default Run Time DMX Fade Time for Lighting Cues set in Production Properties - Run Time Settings.
•Use this fade up time: This will enable the associated Fade Time field, allowing you to enter the required fade up time in seconds and decimals of a second (eg 1.5).
Fade down time for fixtures that need to be faded down: This drop-down list determines the fade down time to be applied to included Channels that have the Fade checkbox selected, where the new DMX value is lower than the DMX value current at run time. The choices are:
•None: No fade will be applied by default, eg if channel 2 is included and has been assigned a value of 59 then when the cue is played SCS will instantly set channel 2 to 59%.
•Use above fade time: This will use the time selected against Fade up time for fixtures that need to be faded up (see above) even if that is None or 0.
•Use this fade down time: This will enable the associated Fade Time field, allowing you to enter the required fade down time in seconds and decimals of a second (eg 1.5).
Fade out time for other active fixtures: If you want any other active and dimmable fixture channels to be faded out (or immediately blacked out) when this cue is run, then select the required option from this list:
•Do not fade out others: As the description implies, any other active DMX channels (ie DMX channels currently with values greater than 0) will be left at their current values. This is in keeping with the 'tracking' method of lighting consoles.
•Use above fade time: Any other active dimmable channels will be faded out over the time selected against Fade down time for fixtures that need to be faded down (see above) even if that is None or 0.
•Use this fade out time: This will enable the associated Fade Time field, allowing you to enter the required fade out time in seconds and decimals of a second (eg 1.5).
Note 1: Separate fade up and fade down times are provided primarily to allow for better cross-fades. Cross-fades can be improved by entering a longer time for the fade down.
Note 2: Fades on other active channels is designed for genuine lighting fades - not for movements etc. So fades on other active fixtures only affects channels identified in the associated Fixture Types as dimmable channels. Fades on other active fixtures does not refer to the 'Fade' checkbox described under 'Channels and Values' above.
Note 3: Times for Use this fade up/down/out time may be entered as parameter id's if the parent cue has an activation method of Callable Cue and where Parameters have been entered. This enables you to have basically the same Lighting Cue but with different fade times based on parameters entered in a 'Call Cue' Cue. See also Callable Cue.
Do NOT blackout other dimmable channels when using 'Live DMX Test': When you use Live DMX Test (described next) SCS will blackout all other active dimmable channels unless you first of all select this 'Do NOT blackout...' checkbox.
Live DMX Test: If you select this checkbox then the DMX Values are sent to the DMX interface. This enables you to check, for example, a real lighting effect while you drag DMX Value sliders until you get the effect and intensity you desire. The purpose of Live DMX Test is to enable you to view the end result of the Lighting Cue. SCS will blackout all other active channels unless you first of all select the 'Do NOT blackout...' checkbox described above.
Reset Items: If you make any changes to the DMX Items, including the use of the DMX Values slider, then you can use the Reset DMX Items button to reinstate the original items and values. Note that this will not reset the Fade time setting or the Fade out time for other active channels setting.
Hotkey/External 'note' and 'toggle' cues
Using 'note' or 'toggle' hotkeys or external activation can be useful. With hotkey 'note' activation, when the hotkey is pressed and held down SCS plays the lighting cue as normal, but when the hotkey is released SCS resets the designated DMX channels to their values prior to the hotkey being pressed. This can be useful for audience blinders, lightning effects, flashes from explosions, etc. With 'toggle' activation, if the current toggle state = 1 (as shown in the hotkey list in the main window) then SCS saves the current DMX channel values for channels used by this cue, and then plays the lighting cue as normal. If the current toggle state = 0 the SCS resets the DMX channel values from the previously-saved values. These actions also apply to the corresponding external activation methods.
|
Run Time Note: If you manually select the next cue in the main window, eg by clicking on a cue in the cue list, SCS attempts to calculate the DMX values that would be active immediately prior to your playing that next cue. Whenever a cue (any cue) is started, SCS records in a temporary database a snapshot of all current DMX channel values, as well as the cue number. Only the latest snapshot for each cue is retained. When calculating DMX starting values, SCS initially looks for an entry in the database to retrieve the DMX values set prior to that cue last being started. If no snapshot is found for that cue, SCS scans all prior Lighting Cues and also Call Cues that call Lighting Cues, and calculates the DMX values from that scan. This is ideal for rehearsals if the director wants to rehearse a part of a scene - possibly several times. If you do not want this calculation to occur, possibly because you are heavily reliant on the use of hotkeys for the current production, then you can disable the feature by selecting the Production Properties Run Time Setting 'Do NOT calculate starting DMX values when manually resetting the next cue'. Note that any DMX snapshots in the temporary database are cleared on opening or creating a cue file, so are only relevant for the current session. |
Lighting Control by External Fader
A Lighting Cue can alternatively be controlled using an external fader, such as a fader on a nanoKONTROL or a Behringer BCF2000 or BCR2000. See Lighting Control by External Fader for details.
DMX Master Fader
Note that SCS provides a DMX Master Fader to enable you to globally adjust the intensity of lighting. See Meter Display and Master Faders for details.
Credit
Special thanks to Bruce Gray, Dieter Edinger, Davide Bellucci and Lluís Vilarrasa for advice on the design of SCS Lighting Cues, and to Michel Winogradoff and Didier Petit for advice on external fader control.