Video/Image Cues
Video/Image Cues are only available with SCS Standard and higher license levels.
Overview
A Video/Image Cue can be used to play a video file (AVI, WMV or MPG) or display a still image (JPG, GIF or BMP).
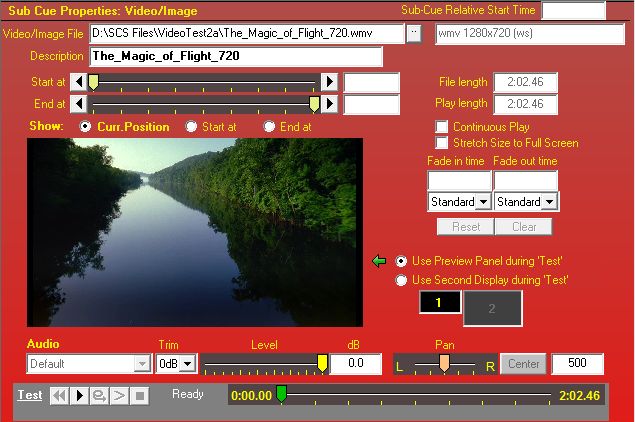
For a Video/Image cue or sub-cue, the lower panel to the right of the cue list tree will contain properties specifically for video/image sub-cues. Some fields are enabled or disabled according to the type of file, ie video or still image. For example, audio properties are only applicable to videos, and the play length field is derived for videos but must be entered for still images. The screen shot and information below is for videos except where otherwise stated. For more information about the properties for still images, see Still Images.
|
Note 1 SCS can handle both videos (WMV/AVI/etc) and still images (JPG/BMP/etc). These are both handled using 'video/image cues'. There are, however, a few differences in available functionality. Still images can be faded in/out and cross-faded, but videos cannot be cross-faded, and they can only be faded in or out if you use xVideo. With other video playback options (eg DirectShow), only the audio can be faded in or out. See also Setting Up Your Video Projector For Videos and Still Images |
|
Note 2 SCS uses DirectShow by default to play video files. If you want to fade video images in and/or out then you will need to use xVideo instead of DirectShow. To select an alternative Video Playback option, go to General Options / Permanent Options, and select the required option from the Video Playback drop-down list. If you have problems playing video files in SCS, see the Troubleshooting topic Video Problems. |
Properties and Controls
General
Sub-Cue Relative Start Time: This field is available for every type of sub-cue. Click here to see the description of this field under Audio File Cues. Then click the Back button in the Help Viewer to return to this page.
Video
Video/Image File: This will contain the path name of the video file to be played. The ... (browse) button can be used to locate the required file. Supported video file formats are AVI, WMV (including high definition WMV) and MPG. Note, however, that the relevant CODEC must be available. Generally speaking, if Windows Media Player can play your video file then the CODEC will be available and SCS will be also able to play the video. If the file format you want to play is not listed in the drop-down file type list in the file selector window, then select 'All Files (*.*) '. As well as common video formats, flash files can also be played if you have the Adobe Flash plugin installed. (For still image formats, see Still Images.)
Description: When you open a video file SCS will display a description derived from the file name. You can change the Description field if required.
Start at and End at: If you do not want to start the cue from the beginning of the file, use the Start at slider or field to select the time at which the cue is to start. If you want SCS to stop the cue before the end of the file then use the End at slider or field to select the time at which you want the cue to stop. The 'End at' field is the absolute time within the file, not the required time after 'Start at'. Leave 'End at' blank to let the cue run until the end of the file (or until you stop it). For example, to get SCS to stop playing the cue at the 15.45 seconds time with the file enter 15.45 in the 'End at' field.
File length: This display-only field shows the duration of the video file.
Play length: This display-only field shows how much of the video file will be played, based on the 'Start at' and 'End at' times. The range of the progress slider is set to this Play Length.
Continuous Play: Tick this checkbox if you want the video to play continuously until stopped manually or by another cue (such as an SFR cue).
Stretch Size to Full Screen: This only affects output to the secondary monitor or video projector. Videos and images are normally shown to the maximum size permitted by the screen, retaining the aspect ratio of the source image. This typically results in a black border above and below the image, or to the sides of the image. If you want your video or image to fill the entire screen, not leaving any black borders at all, then select this checkbox. This may give you a distorted image, stretched either vertically or horizontally, but in many cases this stretching may not be very noticable.
This property is implemented for still images, and for videos played using xVideo. As this property is set for each cue or sub-cue, you can choose which of your videos and images you want stretched to full screen.
Fade in time: Use this field if you want SCS to fade in the video file. Leave blank if fade in is not required. For example, to fade in over 5 seconds enter 5 under 'Fade in time'. Please note that fading the video image is only available using xVideo as the Video Playback option (which is the default). Other Video Playback options only support fading the audio, not the image.
Fade out time: Use this field if you want SCS to fade out the video file. Leave blank if fade out is not required. For example, to fade out over 10 seconds enter 10 under 'Fade out time'. Fade out is also activated automatically at the specified number of seconds before the end of the cue, if you do not fade out the cue manually or with a Fade-Out cue. Please note that fading the video image is only available using xVideo as the Video Playback option. Other Video Playback options only support fading the audio, not the image.
Type of fade: Under the 'Fade in time' and 'Fade out time' fields is the Type of fade drop-down list. The default fade type is 'Standard', which follows a linear track of the level faders. Other options include logarithmic and linear fades. A 'linear' fade is not the same as a 'standard' fade as the level faders are not linear across the entire range.
Audio
Audio device: For video files, the audio is only played through the default audio device declared in your Windows environment. This is because SCS currently uses the Windows Media Player API to play videos, and this API does not provide the option to specify the audio device. Another limitation is that the audio is not displayed in the VU meters.
Trim: You should only need to use this control if you have files to be played at a low level and you are having difficulty setting the level using the Level control. With the Trim control you can apply an overall reduction in the level of up to 50dB.
Level: The level fader sets the level (volume) at which SCS will play the cue, after the fade in time if specified. The setting of the fader is also displayed and is enterable as a dB value. The maximum dB setting (loudest) setting is 0dB, which represents the level of the audio file as recorded, ie without any attenuation. If you set the level to -75 or lower then SCS treats this as -infinity, ie silent. You may also enter this as -INF.
Pan: The pan controller sets the stereo position of the sound. The setting of the controller is also displayed and is enterable as a number, where 0 is left, 500 is center, and 999 is right. The Center button is enabled if the current value is not 500 (center). Clicking this button sets pan to 500 (center).
|
Tip: If you want to make fine adjustments to the level or pan, left-click the slider and then use the left-arrow and right-arrow keys as required. When you left-click the slider the background color of the slider will change to your Windows color scheme's selected item color (probably blue). This indicates that the slider has focus so keyboard actions like left-arrow and right-arrow are processed by that slider. |
|
Tip: For theatre or music productions, you will often want just the video image - not the audio. To mute the audio simply move the Level slider to the minimum setting. |
|
Testing your Video Cue You can test your Video Cue or Sub-Cue using the controls available in the 'Test' panel and also the two radio buttons that indicate where the video is to be displayed. Just press the multimedia play button to start the test. You can also use the other transport controls as required. The video can either be displayed in the preview panel or on the second display. If SCS does not detect a second display then only the preview panel option is available. Use Preview Panel during 'Test': If this option is selected then the video is displayed in the panel to the left. Use Second Display during 'Test': If two or more displays are available then selecting this option displays the video on the second display. Below this option are two icons representing the two displays (numbered 1 and 2). If you hover the mouse pointer over these icons SCS will display the size of the respective display, eg 'Monitor 2: 1024 x 768'. While the video file is playing you may experiment with the audio level and pan controls. The slider alongside the multimedia controls shows the progress of the cue. You can also use this to reposition the cue at any point. With video files there may be a slight delay during repositioning. If you want to make fine adjustments to the position, left-click the slider and then use the left-arrow and right-arrow keys as required. |