Video/Image Cues - Still Images
Overview
Still images can be included in Video/Image Cues. Although Video/Image Cues can handle multiple video/image files, you may alternatively just include a single file in a cue.
You can also select an image to be displayed as a 'logo' whenever no other video/image cues are being played to the selected screen. For example, instead of the default black screen you could display a company logo or an image in keeping with the production.
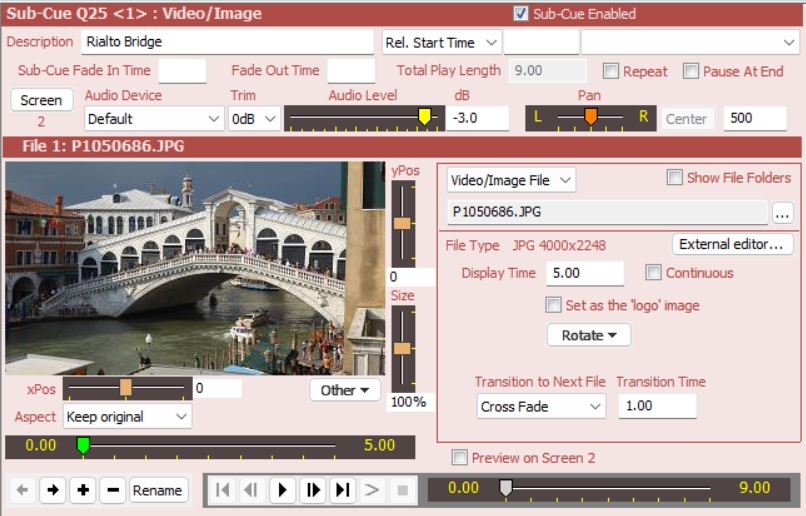
When you add or select an image file in a Video/Image cue or sub-cue, a sub-cue panel like this will be displayed:
Properties and Controls
Properties are as described under Video/Image Cues except for the following:
Images
This section describes the properties available for handling image files. For details of properties available for handling video files, see Video/Image Cues.
Video/Image File: This field is common to both videos and still images, and if the type of file selected here determines how the remainder of this section is displayed, ie for video or for still image. The field contains the name of the image file to be displayed. The ... (browse) button can be used to locate the required file. Still image formats accepted are PNG, JPG, BMP and GIF. NB although the term 'still image' is used extensively, SCS also supports animated GIF's, which are obviously not 'still'.
File Type: Summarized information about this file, including the width and height.
External editor: If you have selected an external Image Editor in Editing Options then SCS will call that Image Editor to enable you to edit the file. Note: when the external editor is called SCS will wait until it is closed before continuing. Upon closure of the external editor SCS will reload the file selected for editing.
Display Time and Continuous: Enter the length of time you want this image to be displayed in Display Time, or select Continuous if the image is to play continuously. The Continuous option is only available for the last file in the cue, and Continuous and Repeat are mutually exclusive - if you want to Repeat the cue then you must set a Display Time for every Image file, including the last Image file. The 'default' Display Time for a new image file is the Display Time of the previous image added or selected. Note that if you have many images in a cue and you want to change the Display Time of some or all of them then just multi-select the thumbnails of the relevant images and then enter the required new Display Time and press the Tab key.
Set as the 'logo' image: This is the property you should select if you want this image to be used as a 'logo' instead of the default black screen displayed when the selected screen is inactive, ie when no other video/image cues are playing to that screen. This could be a logo, but it may be any image supported by SCS. A few important points about 'logo' images:
•If you select this checkbox then the Display Time and Continuous properties are cleared as they are not applicable.
•A logo image, if used, must be the only item in a video/image cue or sub-cue.
•When a logo image sub-cue is played, the image is saved and, if applicable, displayed. The sub-cue is then marked as 'completed'.
•Typically you would have a logo image cue at the top of your cue list.
•The Sub-Cue Fade In Time can be set to fade in the logo image whenever it is to be displayed. This avoids having the image displayed suddenly. The Fade Out Time, however, is not used.
Rotate: This button provides options to rotate or flip the image. You can both rotate and flip if required. The selected option will be displayed to the right of this button, unless the image is in the normal default state. The selected option will be stored as a sub-cue property so will be preserved between SCS sessions.
xPos, yPos, Size and Aspect: These four controls enable you to adjust how the image is displayed. For example:
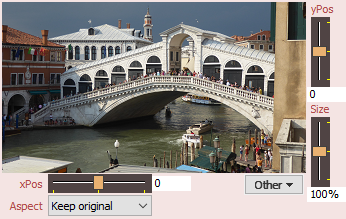
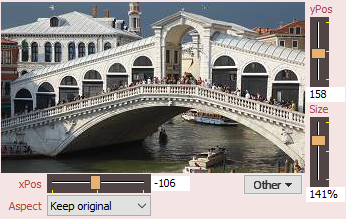
The first screenshot shows the full image as it would be displayed using the default settings. The second screenshot shows how the image would be displayed with adjustments made to the size and position (using sliders Size, xPos and yPos).
Each of these sliders has an associated text field (eg the text field for yPos in the second image shows 158). You can enter any required value into these fields for more precise settings. The xPos and yPos settings are display offsets (positive or negative) up to the source width or source height.The Size field is a percentage in the range 0% to 200%. A setting of 0% is no display at all, and 200% is double-size.
See Using SCS Sliders for tips on resetting the sliders to their default values.
The Aspect control (not changed in the above example) specifies the aspect ratio for the displayed image, ie how the image is displayed on the target screen. If you want the aspect ratio unchanged then leave this control at Keep original. Other options are: Full screen, 16:9, 4:3, 1.85:1, 2.35:1, and Custom. If you select Custom then a slider will be displayed giving you variable control of the aspect ratio.
|
Moving the Video/Image using the Mouse or Keyboard You can also adjust the video/image position (X and Y position) by clicking and dragging the image in the preview panel. Alternatively, while the mouse cursor is over the image in the preview panel you can use the arrow keys on your keyboard to move the image. If you hold down a shift key when using the arrow keys, then increments are small (about 1 pixel of the selected 'Screen'). Resizing the Video/Image using the Mouse Wheel or Keyboard While the mouse cursor is over the image in the preview panel you can zoom in or zoom out (ie change the size) by using the mouse wheel. Alternatively, while the mouse cursor is over the image in the preview panel you can use the + and - keys on your keyboard to resize the image. If you hold down a shift key when using the + or - keys, then increments are small (about 1 pixel of the selected 'Screen'). |
Other: The first option under this control is Use default position, size and aspect. This item will be enabled if any of Size, xPos and yPos are not at their default settings. The item enables you to easily reset the controls to their defaults. Other items under the Other control are Copy position, size and aspect into clipboard, and Paste position, size and aspect from clipboard. These items are useful if you have made adjustments to position, size and/or aspect for an image and want to use those same settings for other images, either in the same cue or in other cues. When you have copied position, size and aspect to the clipboard, then Paste... option is then changed to identify the source, eg Paste position, size and aspect from clipboard (copied from Q12<.3> (DSC_2862.JPG)).
Transition to Next File: For an explanation of the transition properties, see the description of this property under Video/Image Cues.
|
Note: SCS buffers up to two still images at a time, which typically will be the currently displayed image plus the next image to be displayed. When an image file is closed, SCS will look for the next image file to be loaded. However, SCS will defer that operation if an image fade is in progress. This is because loading an image file can affect the performance of the fade, especially if the image file being opened is large. If you are displaying images continuously using cross-fades then make sure the Display Time is at least 0.5 second greater than the cross-fade Transition Time to give sufficient time for SCS to load the next image. This will not be an issue for normal slide show use where each image has a period of time in which it is visible on its own. It would only be an issue if you want to continuously fade between images. |
|
Animated Image Limitations •The following properties cannot be set for an animated image (eg for an animated GIF): xPos, yPos, Size, Aspect, Rotate, Logo. •Although fading of animated images is supported, we do not recommend using fades for an animated image that is displayed to more than one screen. The processing time required to resize and blend each frame for multiple screens can exceed the frame delay times of the animated image. |