Level Change Cues
Level Change Cues (LCQ's) are only available with SCS Standard and higher license levels.
|
Level vs Volume In SCS terminology we use the word level for what is generally known as volume. Level refers to a relative signal level in decibels, whereas volume refers to the loudness of a sound. Levels in SCS cue files are stored in decibels. |
Overview
Often you will have a sound cue that starts at a fairly high level and then is to drop to a lower level below dialog. This can be done by riding the fader on the sound desk, but sometimes you may want to apply this fade from the computer. One example of this is where you have two sound cues running simultaneously, and you want to fade only one of them. You can achieve this by use of a Level Change Cue. With the Level Change Cue you nominate the cue or sub-cue whose level you want to change, the required new level and/or pan settings for each devices, and the time over which the change is to occur. The new level may be lower or higher than the current level.
Level Change Cues also enable you to change the Playback Rate, Tempo or Pitch if the nominated cue or sub-cue is an Audio File Cue. See Change Playback Rate, Tempo or Pitch via Level Change Cue for details.
You can have more than one Level Change Cue for any nominated cue or sub-cue. So after dropping the level of a cue during dialog you could have another Level Change Cue to increase the level again, and maybe to pan the sound to one side.
Note: See also Level Envelope for details on how to setup a level envelope within an Audio File cue.
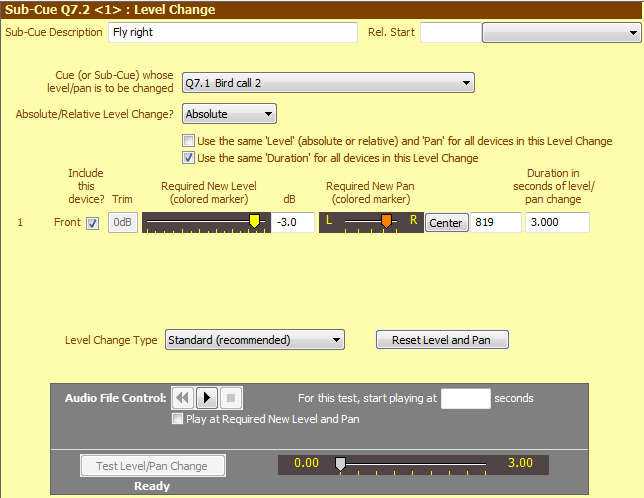
For a Level Change cue or sub-cue, a sub-cue panel like this will be displayed:
Properties and Controls
General
Description: Enter a description for this sub-cue. You can leave this field blank and let SCS create a default Description based on the selected cue.
Rel. Start Time (Relative Start Time): These fields are available for every type of sub-cue. For details see Rel. Start Time under Audio File Cues.
Cue (or Sub-Cue) whose level/pan is to be changed: Select from the drop-down list the cue or sub-cue whose level and/or pan is to be changed. This is also referred to as the 'Target' cue or sub-cue. The target may be an audio file, playlist or video cue or sub-cue.
|
Changing the Target Cue or Sub-Cue If you change the target cue or sub-cue then SCS will retain the current device settings where possible and feasible. So if the previous target cue in this LCQ used devices 'Front' and 'Rear' and the new target cue uses device 'Front', 'USL' and 'USR' then on applying this change SCS will retain whatever LCQ device settings you had for 'Front'. The device settings for 'USL' and 'USR' would be set as they would if this was a completely new LCQ, ie as it would if the target cue field was previously blank. SCS will not retain device settings if the new target cue or sub-cue is of a different type, eg if it was previously for an Audio File Cue but is now for a Playlist Cue. |
Action: The following actions are available:
•Absolute Level: eg change the level to -12dB.
•Relative Level: eg lower the current level by 6dB.
•Change playback rate (affects both tempo and pitch)
•Change tempo (does not affect pitch)
•Change pitch (does not affect tempo)
(The Change... actions are only available with SCS Professional and higher licenses.)
The default setting for this drop-down list is the last setting used or found this SCS session, or Absolute if this is the first Level Change added or found.
The remainder of this help page relates to Absolute level changes. For information about Relative level changes, see Relative Level Changes. For information about Change playback rate, Change tempo and Change pitch, see Change Playback Rate, Tempo or Pitch.
Level and Pan Changes
The level and/or pan settings for each device used by the selected audio file sub-cue can be changed independently. You can, for example, change a level in one device and leave the level of another device unchanged.
Use the same 'Level' and 'Pan' for all devices in the Level Change: This is only relevant if the target cue has more then one device. If you select this checkbox then you just need to set the Required New Level and/or Required New Pan for the first included device and the same setting will apply to all included devices.
Use the same 'Duration' for all devices in the Level Change: This is only relevant if the target cue has more then one device. If you select this checkbox then you just need to set the Duration for the first included device and the same setting will apply to all included devices. This checkbox is selected by default.
Include this device?: This checkbox enables you to process a Level Change on selected devices only. To exclude a device from this Level Change, clear the corresponding checkbox.
Required New Level: With this fader or dB field you can select the new level you want for this cue. The colored marker is for the required new level, and the white marker shows the current or 'expected' level. The setting of that is derived from the level of the target or from the required new level of the most recent level change cue or sub-cue for the target. See also the Note Regarding Playlists (below).
If you want to make fine adjustments to the Required New Level (colored marker), left-click the slider and then use the left-arrow and right-arrow keys as required. To simultaneously adjust the Required New Level for all selected devices then you can use the keyboard Shortcuts for Decrease (or Increase) Levels of Playing Cues. By default these shortcuts are Shift+F11 and Shift+F12.
Required New Pan: With this fader or the number field you can select the new pan you want for this cue. The colored marker is for the required new pan, and the white marker shows the current or 'expected' pan. The setting of that is derived from the pan of the target or from the required new pan of the most recent level change sub-cue for the target. The Center button is enabled if the Required New Pan is not center. Clicking this button sets Required New Pan to center.
If you want to make fine adjustments to the Required New Pan (colored marker), left-click the slider and then use the left-arrow and right-arrow keys as required.
Duration in seconds of level/pan change: Specify the time over which the level/pan change is to occur. For example, to change the level/pan over 4.5 seconds, enter 4.5 in this field. The default duration is 0.000 seconds, which will cause an instant change.
Level Change Type: Select the type of level change you require. The default is 'Standard', which follows a linear track of the level faders. Other options include logarithmic and linear changes. A 'linear' change is not the same as a 'standard' change as the level faders are not linear across the entire range.This does not affect how pan is controlled - a change in a pan setting is always linear.
|
If your Level Change Cue is to cross-fade a sound, eg from Rear to Front, then we recommend you set the Level Change Type to Linear as this provides a smoother cross-fade. |
Reset Level and Pan: This button sets the Required New Level and Required New Pan settings to the 'expected' settings.
|
Note Regarding Playlists If a Level Change is applied to a Playlist, the Required New Level specifies the whole-of-playlist required levels (per device). Note that these will be adjusted by the Relative Level (%) of each track in the playlist. The default Relative Level (%) is 80%. This percentage is applied to the internal conversion of the level from dB to a linear scale. |
|
Testing your Level Change Cue You can test your Level Change Cue using the controls available in the 'Test' panel. Having optionally set your Required New Level and Pan, and also the Duration, click the 'play' button. The audio will then start playing based on the 'expected' level and pan (indicated by the white markers). Now click the Test Level and Pan Change button. The level and pan will now change to the Required New Level and Pan, over the time specified in the Duration. While the audio is still playing, you can fine-tune the Required New Level and Pan simply by dragging the relevant sliders and listening to the result. When you are satisfied with the result, just clikc the 'stop' button. The current positions of the colored markers will be saved for this Level Change Cue. If want your level/pan change to occur, say, 30 seconds into a cue, then you can start the sound cue somewhere near that point. For example, to start the test of the sound cue after 27 seconds, enter 27 against 'For this test, start playing at'. (The test may not be reliable if the previous state of the cue or sub-cue to be changed had devices excluded in a previous Level Change.) If your target is a Playlist with random selection, then the track currently first in the play order will be used in the test. |