Audio File Cues
Some features only available with SCS-Standard and/or higher license levels.
Adding a new Audio File Cue or Sub-Cue
To add a new Audio File Cue, click the Cues button in the Editor's toolbar and select Add 'Audio File' Cue, or if you have Add Audio File Cue in the Favorites then just click that button. To add a new Audio File Sub-Cue, click the Sub-Cues button in the toolbar and select Add 'Audio File' Sub-Cue, or if you have Add Audio File Sub-Cue in the Favorites then just click that button.
On selecting the option, an Audio File Selector window will be opened to enable you to select the required Audio File.
|
Tip: In the Audio File Selector window you can select multiple files, and SCS will create a separate Audio File Cue for each file you select. The order of the cues will be the order of the selected files in the list. |
|
Tip: If you do not yet have the audio file you want to use for the cue then you can create a Place Holder for the Audio File cue. To do this, simply select Cancel in the Audio File Selector, and you will be asked if you want to create a Place Holder, so just click Yes. This will create an Audio File Cue which can be 'played' just like any other audio file cue, but will, of course, immediately complete as there is no file selected and the duration of the cue is 0.000 seconds. When you are ready to assign an audio file to this Place Holder cue, simply click the Browse (...) button to select the required file. (If you Cancel the Audio File Selector and then click No when asked if you want to create a Place Holder, then the Add Audio File Cue operation is also canceled.) |
Viewing or Changing an Audio File Cue or Sub-Cue
To view or change an Audio File Cue or Sub-Cue, just click on the relevant node in the Editor's Cue List.
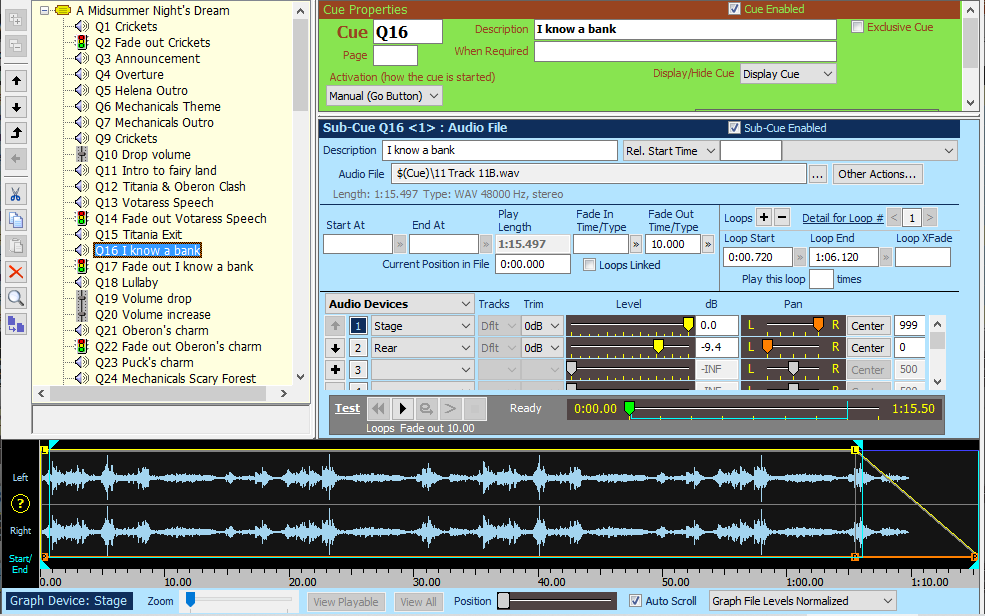
When you have added or selected an Audio File cue or sub-cue, a cue and sub-cue panel like this will be displayed:
|
Resizing the window •The audio graph is displayed the full width of the Editor window. If you change the width of the Editor window then the audio graph will also be resized. •If you change the height of the Editor window, or the position of the splitter bar between the Cue Properties and the Sub-Cue Properties, then the number of Audio Device entries visible will be adjusted. |
Properties and Controls
General
Description: When you open an audio file SCS will examine the file and display the title as the 'Description' of this sub-cue. If the title cannot be found then SCS will display a description derived from the file name. You can change the Sub-Cue Description field if required. Note: you can force SCS to ignore the title and always use the file name by setting the Editing Option 'Ignore file title tags when setting default descriptions'.
Rel. Start Time (Relative Start Time): This field is available for every type of sub-cue. It is designed for cues that contain multiple sub-cues, and enables you to delay the starting of a sub-cue. For example, suppose your first sub-cue for this cue is an Audio File sub-cue that starts immediately the cue starts, and you want a number of Control Send sub-cues to start at set times during the playback of that audio file. You can do that by setting the Relative Start Time on the Control Send sub-cues. Enter a relative time in seconds, eg 24.75, or minutes and seconds, eg 1:30.00, or leave the field blank if you do not want to delay the start. The drop-down list alongside this field enables you to select other relative start points, such as 'after end of previous sub-cue'. If you leave the drop-down field blank, SCS assumes 'after start of this cue'.
If available, the Rel. Start Time combobox may also include Relative MTC and On Cue Marker.
Relative MTC is only available if the cue itself has an Activation Method of 'MIDI Time Code', and the Relative MTC you enter will be added to the cue's MIDI Time Code. For example:
![]()
If the cue's Activation Method is MIDI Time Code 12:30:00:00 then this sub-cue will start when the MIDI Time Code is 12:30:23:04. This enables you to set up a cue with multiple sub-cues each controlled by a relative MTC, so if you need to change the cue's MIDI Time Code then you do not need to change the time codes of that cue's sub-cues. Even though the MIDI Time Code comprises 4 separate fields, you can use "." to tab between them. This enables you to enter Relative MTC times just using keys on the numeric pad.
On Cue Marker is only available if this cue has an earlier Audio File or Video File sub-cue that has Cue Markers defined (or Cue Points). For example:
![]()
This example is for a sub-cue of Q42, and the first sub-cue of Q42 is an audio file sub-cue with cue markers, including the cue marker M4 positioned at 2:02.69. This sub-cue will start when cue marker M4 is reached during playback of the audio file in Q42<1> (the first sub-cue of Q42).
Tip: This On Cue Marker example was taken from a cue file that activates different lighting sub-cues at different cue markers in Rockin' Around the Christmas Tree. The cue includes several chase lighting sub-cues timed to exactly match the beat of the music (which was 70bpm), as well as a couple of non-chase lighting sub-cues.
Audio File
Audio File: This will contain the path name of the sound file to be played. The ... (browse) button can be used to locate a file if you wish to change the currently-selected file. Supported file formats are WAV, MP3, WMA, AAC, M4A, OGG, AIFF, FLAC and APE. Note that some compression formats lose audio quality. See Audio File Selector for information on how to preview audio files before including them in your cue file.
If you try to open a file that has DRM (Digital Rights Management) protection then SCS may not be able to open it - you may get the error message: 'The file is protected (license required)'.
If the field starts with $(Cue) this indicates the audio file is in the same folder as the cue file (the .scs11 file). This is the ideal place to keep your audio files as it helps when transferring your production to another computer - see Collect Production Files. Even if you do not intend to transfer your production to another computer, it is still beneficial to collect your files into a 'Production Folder' to safeguard your audio files from subsequent editing, etc. It can be frustrating if you want to revisit a production you ran a year ago if some of the files are no longer there!
See also Drag and Drop for details on how a file can be dragged from an external application.
Other Actions: Clicking this button displays a pop-up menu with the following actions available:
•Reset the Start, End, Loop and Fade times to their initial values: Resets the time and loop fields to their currently saved values, which normally would be the values initially displayed for this cue.
•Clear the Start, End, Loop and Fade times: Clears the time and loop fields.
•Trim complete silence from start: Sets the 'Start At' time by trimming silence from the start of the file.
•Trim all below -75dB/-60dB/-45dB-30dB from start: Sets the 'Start At' time by trimming audio below the selected dB level from the start of the file.
•Trim complete silence from end: Sets the 'End At' time by trimming silence from the end of the file.
•Trim all below -75dB/-60dB/-45dB-30dB from end: Sets the 'End At' time by trimming audio below the selected dB level from the end of the file.
•Change Playback Rate, Tempo or Pitch:
•Rename the Audio File: If you wish to rename the audio file you have selected for this Audio File cue, then select this action to open the Rename File window.
•Edit with external editor: If you have selected an external Audio Editor in Editing Options then SCS will call that Audio Editor to enable you to edit the file. Note: when the external editor is called SCS will wait until it is closed before continuing. Upon closure of the external editor SCS will reload the file selected for editing.
Note that the 'trim' items just set the 'Start At' or 'End At' times and you can try different menu choices to achieve the best result. SCS does not remember any menu choice you used to set the 'Start At' or 'End At' time, but does remember the 'Start At' and 'End At' times.
Time Fields
Start At: If you do not want to start the cue from the beginning of the file, enter the time at which the cue is to start, or drag the ![]() handle (below the graph) to the required position on the graph. Leave Start At blank to start at the beginning of the file. If you have a Professional Plus or higher license and the file has 'cue points' or 'markers', then the adjacent chevron button (») will be enabled. Click that button to view the Audio File Cue Points and Markers window, where you may select a cue point from the list displayed. If a cue point or marker has been selected then the Start At field will be disabled as the Start At position is effectively locked into the selected cue point or marker. The 'start' handle on the graph will also be disabled. See also Other Actions below. You can also set Start At by right-clicking on the graph approximately where you want to start at, and selecting Set 'Start At' position from the pop-up menu.
handle (below the graph) to the required position on the graph. Leave Start At blank to start at the beginning of the file. If you have a Professional Plus or higher license and the file has 'cue points' or 'markers', then the adjacent chevron button (») will be enabled. Click that button to view the Audio File Cue Points and Markers window, where you may select a cue point from the list displayed. If a cue point or marker has been selected then the Start At field will be disabled as the Start At position is effectively locked into the selected cue point or marker. The 'start' handle on the graph will also be disabled. See also Other Actions below. You can also set Start At by right-clicking on the graph approximately where you want to start at, and selecting Set 'Start At' position from the pop-up menu.
End At: If you want SCS to stop the cue before the end of the file then enter the time at which you want the cue to stop, or drag the ![]() handle (below the graph) to the required position on the graph. This is the absolute time within the file, not the required time after 'Start At'. Leave End At blank to let the cue run until the end of the file (or until you stop it). If you have a Professional Plus or higher license and the file has 'cue points' or 'markers', then the adjacent chevron button (») will be enabled. Click that button to view the Audio File Cue Points and Markers window, where you may select a cue point from the list displayed. If a cue point or marker has been selected then the End At field will be disabled as the End At position is effectively locked into the selected cue point or marker. The 'end' handle on the graph will also be disabled. See also Other Actions below. You can also set End At by right-clicking on the graph approximately where you want to end at, and selecting Set 'End At' position from the pop-up menu.
handle (below the graph) to the required position on the graph. This is the absolute time within the file, not the required time after 'Start At'. Leave End At blank to let the cue run until the end of the file (or until you stop it). If you have a Professional Plus or higher license and the file has 'cue points' or 'markers', then the adjacent chevron button (») will be enabled. Click that button to view the Audio File Cue Points and Markers window, where you may select a cue point from the list displayed. If a cue point or marker has been selected then the End At field will be disabled as the End At position is effectively locked into the selected cue point or marker. The 'end' handle on the graph will also be disabled. See also Other Actions below. You can also set End At by right-clicking on the graph approximately where you want to end at, and selecting Set 'End At' position from the pop-up menu.
Play Length: This display-only field shows how much of the audio file will be played, based on the earlier of 'Start At' and 'Loop Start', up to the later of 'Loop End' and 'End At'. The range of the progress slider is set to this Play Length.
Fade In Time/Type: Use this field if you want SCS to fade in the audio file, or create a fade-in level point using the Level Envelope facilities. Leave the field blank if fade in is not required. For new Audio File cues the Fade In Time is initially set to the default value nominated in Production Properties - General. For example, to fade in the cue over 3 seconds enter 3 under 'Fade In time'. When you start the cue the level will build from no sound to the level specified by the Level fader(s) over the time specified (3 seconds in this example). SCS supports a few built-in fade curves. The default fade curve (or fade type) is 'Standard', which follows a linear track of the level faders. Other options include logarithmic and linear fades. A 'linear' fade is not the same as a 'standard' fade as the level faders are not linear across the entire range. To select a Fade In Type other than 'Standard' click the adjacent chevron button (»). A pop-up window will allow you to select the required fade type from a drop-down list. You can also enter the required fade in time in that same window, although this is just a replica of the Fade In Time field.
Fade Out Time/Type: Use this field if you want SCS to fade out the cue, or create a fade-out level point using the Level Envelope facilities. Leave the field blank if fade out is not required. For new Audio File cues the Fade Out Time is initially set to the default value nominated in Production Properties - General. For example, to fade out the cue over 4 seconds enter 4 under 'Fade out time'. When you fade out the cue the level will fade to no sound over the time specified (4 seconds in this example). Fade out is also activated automatically at the specified number of seconds before the end of the cue, if you do not fade out the cue manually or with an SFR Cue. SCS supports a few built-in fade curves. The default fade curve (or fade type) is 'Standard', which follows a linear track of the level faders. Other options include logarithmic and linear fades. A 'linear' fade is not the same as a 'standard' fade as the level faders are not linear across the entire range. To select a Fade Out Type other than 'Standard' click the adjacent chevron button (»). A pop-up window will allow you to select the required fade type from a drop-down list. You can also enter the required fade out time in that same window, although this is just a replica of the Fade Out Time field.
Current Position in File: This field displays the current time position within the file. It is an editable field so if you want to set the current position to some specific value then you can do that by keying in the required position. You can also set the current position by a single-left-click on the graph.
Time Offset for Cue Position Display (not shown in the above screenshot, but when displayed will be immediately below 'Current Position in File'): This field is only displayed if the Production Properties - Run Time Setting 'Give Visual Warning' is set to 'Cue position plus optional time offset'. This setting is not likely to be used often but can be useful where SCS is used for ballet music. The music for a particular item may be using an audio file that has been cut from a longer file, but the director may wish to see the position based on the original full-length music track. This can be achieved using this property. For example, if the audio file for the cue was cut from a longer file starting at position 3:25.060 then this time can be entered into this Time Offset field. When the cue is started, the Cue Position display will start from that setting, ie 3:25.060 in this example. Also, the caption of the display will contain 'Cue position + 3:25.060'.
Loop Fields
You can optionally set up loops within an Audio File cue. SCS supports up to 8 loops per cue, but loops may not overlap. Note that loops are not available if you have added Standard Level Points (see Level Envelope).
To Add a Loop, click the Loops + button. The Detail for Loop # field will be incremented and the other loop fields will be primed for the new loop. If this is the first loop then the Loop Start and Loop End points are initially set to start and end of the cue. If this is not the first loop then the initial Loop Start and Loop End points of the new loop will be set to follow the currently-displayed loop. You can, of course, change these settings.
Detail for Loop #: Click the < or > buttons to step through the available loops. The Loop Start and other fields will show details for that loop.
Loop Start: Enter the position within the file at which the loop is to start, or drag the ![]() handle (above the graph) to the required position on the graph. Leave Loop Start blank to loop from the beginning of the file. If you have a Professional Plus or higher license and the file has 'cue points' or 'markers', then the adjacent chevron button (») will be enabled. Click that button to view the Audio File Cue Points and Markers window, where you may select a cue point from the list displayed. If a cue point or marker has been selected then the Loop Start field will be disabled as the Loop Start position is effectively locked into the selected cue point or marker. The 'loop start' handle on the graph will also be disabled. You can also set Loop Start by right-clicking on the graph approximately where you want to start the loop, and selecting Set 'Loop Start' position from the pop-up menu.
handle (above the graph) to the required position on the graph. Leave Loop Start blank to loop from the beginning of the file. If you have a Professional Plus or higher license and the file has 'cue points' or 'markers', then the adjacent chevron button (») will be enabled. Click that button to view the Audio File Cue Points and Markers window, where you may select a cue point from the list displayed. If a cue point or marker has been selected then the Loop Start field will be disabled as the Loop Start position is effectively locked into the selected cue point or marker. The 'loop start' handle on the graph will also be disabled. You can also set Loop Start by right-clicking on the graph approximately where you want to start the loop, and selecting Set 'Loop Start' position from the pop-up menu.
Loop End: Enter the position within the file at which the loop is to end, or drag the ![]() handle (above the graph) to the required position on the graph. Leave Loop End blank to loop up to the end of the file. If you have a Professional Plus or higher license and the file has 'cue points' or 'markers', then the adjacent chevron button (») will be enabled. Click that button to view the Audio File Cue Points and Markers window, where you may select a cue point from the list displayed. If a cue point or marker has been selected then the Loop End field will be disabled as the Loop End position is effectively locked into the selected cue point or marker. The 'loop end' handle on the graph will also be disabled. You can also set Loop End by right-clicking on the graph approximately where you want to end the loop, and selecting Set 'Loop End' position from the pop-up menu.
handle (above the graph) to the required position on the graph. Leave Loop End blank to loop up to the end of the file. If you have a Professional Plus or higher license and the file has 'cue points' or 'markers', then the adjacent chevron button (») will be enabled. Click that button to view the Audio File Cue Points and Markers window, where you may select a cue point from the list displayed. If a cue point or marker has been selected then the Loop End field will be disabled as the Loop End position is effectively locked into the selected cue point or marker. The 'loop end' handle on the graph will also be disabled. You can also set Loop End by right-clicking on the graph approximately where you want to end the loop, and selecting Set 'Loop End' position from the pop-up menu.
Loop XFade: In this field you can enter a loop cross-fade time. This will cross-fade audio from the end of the loop to the start of the loop, which should eliminate any click and therefore make it easier to setup your loops. This will, of necessity, reduce the length of your loop by the duration of the cross-fade. For example, if you have a loop that lasts 30 seconds and you specify a cross-fade time of 1 second, then at 29 seconds into the loop the sound will cross-fade with the start of the loop.
Play this loop [ ] times: This property enables you to nominate a fixed number of iterations of the loop. For example, if you set this field to 4 then the loop will be heard 4 times. You can still stop the cue or release the loop early if you wish to - this field is effectively the maximum or default number of iterations of the loop. Leave the field blank to loop until stopped or released manually or by another cue.
The following property (Loops Linked) is not included in the Loops panel as it applies to all loops, ie not separately for each loop. It is displayed in the panel to the left of the Loops panel.
Loops Linked: Audio File Cues with linked sub-cues may include loops. The loops (if required) must be specified in the first of the Audio File sub-cues, and the loops may then also be automatically applied to the linked sub-cues. This Loop Linked checkbox is provided to indicate that any linked sub-cues are to have the loop applied to those sub-cues as well. Do NOT enter the loop details into the linked sub-cues or SCS will break the 'link'. Note that the Loops Linked property only loops correctly if the BASS mixer is used (or you use ASIO instead of DirectSound/WASAPI). SCS automatically switches (if necessary) to using the BASS mixer if when loading a cue file it finds one or more cues using the Loops Linked property.
Adjusting Start At, End At, Loop Start, Loop End, Loop XFade, Fade In and Fade Out time fields using arrow keys: If you want to fine tune these fields, click on the required field to highlight it and then use Ctrl/Left-Arrow to reduce the time field by 0.01 second (1/100 second), or Ctrl/Right-Arrow to increase the time field by 0.01 second (1/100 second). When using these keyboard shortcuts, SCS drops the thousandths of a second.
Audio Graph Controls
The audio graph shows levels for the currently-selected device. You can show the graph for a different device simply by clicking on the relevant device number (eg '2') or by clicking on any control for that device (eg the 'Level' control). Horizontal light blue lines show the 'Level' for that device, which is -3.0dB in the above example.
If the audio file contains a very large number of samples (eg several 100 million) then SCS may bypass drawing the audio graph due to the excessive amount of memory required to load the samples data.
The audio graph will also not be displayed if the file's duration is greater than the Editing Option Max. File Length for Audio Graph File Scan. Instead, a message will be displayed advising you of this.
Zoom: Move this slider to the right to zoom in on the graph, or to the left to zoom out. One of the vertical markers on the graph will show small yellow markers at the top and bottom of the line. (This may not be the case after resetting or clearing the time and loop fields.) The line with the yellow markers shows which line was last set, and when you zoom the graph the zoom will be based around that line. For example, if you drag the Loop Start handle to approximately where you want it, you can then zoom in to set the position more accurately, and the zooming in will keep that loop start position in view.
View Playable: The 'playable' area is normally the section of the audio file between the 'start at' and 'end at' position, so in the screen shot above the playable area is the section of the file between 7.316 and 2:22.131. By clicking this button the graph is redisplayed showing just that section.
View All: If you have zoomed in and you want to redisplay the whole file then you can click the View All button.
Position: This scrollbar gives an indication of how much of the file is displayed in the graph and how far through the file the graph represents. You can move the 'thumb' of the scrollbar to scroll the graph forwards or backwards. The scrollbar is disabled when the entire file is displayed. You can also move the displayed part of the graph by dragging the graph left or right. To do this just click and hold anywhere on the graph (except on a level point marker) and then drag left or right. Warning: if you click but do not drag then SCS treats this as a 'reposition' request and changes the current position.
Auto Scroll: If checked and you have zoomed in on the audio graph, then when you play the audio file the graph will auto scroll to ensure the current position is always in view.
Graph ... Levels: This control allows you to adjust how you see the audio graph displayed. Note that this only affects the display of the graph - it does not affect the actual audio playback levels. The options are:
•Graph File Levels: The whole graph is based on the levels recorded in the audio file. This is the default setting.
•Graph File Levels Normalized: As Graph File Levels except that SCS will scan the graph for the highest peak and display the graph scaled so that this highest peak reaches the top of the graph. This can make it easier to see where you may want to set level points.
•Graph Adjusted Levels: The graph shows levels adjusted by the device level, fade-in and fade-out, and level point adjustments.
•Graph Adjusted Levels Normalized: As Graph Adjusted Levels except that SCS will scan the graph for the highest peak and display the graph scaled so that this highest peak reaches the light blue 'device level' line.
|
Notes: •To display the graph SCS scans and decodes the audio file, which can take several seconds for a large file. However, once the graph has been built SCS saves the graph information in a database in the same folder as your cue file (the .scs11 file) so the next time you view this audio file cue the graph will be displayed 'instantly'. •There are two major phases in assembling the data for the graph. The first phase is reading and decoding data from the audio file and populating an internal 'samples' array. While this phase is in progress a yellow progress bar will be displayed. The second phase is pulling data from the 'samples' array to populate an array that matches the graph's display width and zoom factor. While this phase is in progress a green progress bar will be displayed. •If the time taken to build these audio graphs is too long then you can suppress the audio graph completely by going to Editing Options and setting the 'Max. File Length for Audio Graph Scan' to 'Do not display audio graph' against the Audio Files setting. •Audio files that have more than 2 channels will have their audio graphs displayed as just two channels. The 'left' channel will be the sum of channels 1, 3, 5, etc, and the 'right' channel will be the sum of channels 2, 4, 6, etc. 'Left' will be replaced by '1+3' or '1+3+5', and 'Right' will be replaced by '2+4' or '2+4+6'. |
|
Useful Keyboard and Mouse Commands: There are some useful keyboard and mouse commands available when the Audio Graph has focus, as explained below: •To set focus to the Audio Graph, either click on one of the level points (identified by L or P), or click anywhere in the graph to set the current position. If you don't want to change the current position, then click on a level point. Warning! Be careful to keep the mouse pointer still when you click on a level point, or you may unintentionally drag the level point to a new position, even if by only a few milliseconds. •You can use the left and right arrows on your keyboard to navigate through the level points. •If you have multiple audio devices assigned to this cue then you can use the up and down arrows on your keyboard to navigate through the audio devices. •You can use the mouse wheel to adjust the zoom. If you want 'fine tuning' of the zoom, hold down a shift key while using the mouse wheel. As mentioned as the start of this note, the above keyboard and mouse commands are only available while the audio graph has focus. So if you move focus away from the audio graph (eg by clicking in the Fade In Time field) then these keyboard and mouse commands will not function. Keyboard shortcuts are also available to Skip Back or Skip Forward 2 Seconds for each press of the keyboard shortcut. The default assignments are Shift+F8 (skip back) and Shift+F9 (skip forward). These shortcuts are not dependent on the audio graph having focus. |
Audio Devices
In this section you will define which audio devices are to used to playback this audio file. It may be that you are just using a single mono or stereo output, in which case you will only need a single entry in this section. However, you can nominate additional audio devices up to the limit supported by your SCS license.
Audio device: The audio devices available are as specified under Production Properties - Audio Output Devices. The use of different audio devices enables you to direct an audio file cue to a particular sound card or output(s) of a multi-channel card. For example, you can have one channel pair feeding the front speakers, and another channel pair feeding rear speakers, etc.
Tracks: (SM-S audio driver only) This enables you to select the track or tracks to be played to this device. The main purpose of this is to allow you to define mono devices in Production Properties but be able to play stereo or other multi-track files spread correctly across multiple devices. For example, to play a stereo file in stereo over two mono devices. The values that may be in the drop-down list are dependent on the number of tracks in the audio file and the number of channels requested for the selected Audio Device (as defined in Production Properties). Here are typical values:
•Dflt: The default assignment of tracks to output channels. For a stereo device, a stereo file will play track 1 to the first channel and track 2 to the second channel. A mono file will be played to both the first and second channels. For a mono device a stereo file will be down-mixed to that single channel.
•1: Play track 1 only to this device. If the device has more than one output channel then track 1 will be played to all the outputs of the device, at the same level.
•2: Play track 2 only to this device. If the device has more than one output channel then track 2 will be played to all the outputs of the device, at the same level.
•3 etc: as above but for track 3 etc.
•All: Play all tracks to all outputs of this device. For example, a stereo file played to a stereo device will have tracks 1 and 2 down-mixed to mono and sent to each output of the device.
Trim: You should only need to use this control if you have files to be played at a low level and you are having difficulty setting the level using the Level control. With the Trim control you can apply an overall reduction in the level of up to 50dB.
Level: The level fader sets the level (volume) at which SCS will play the cue, after the fade in time if specified. The setting of the fader is also displayed and is enterable as a dB value. The maximum dB setting (loudest) setting is 0dB or +12dB, depending on the 'Maximum Audio Level' set in Production Properties - Run Time Settings. 0dB represents the level of the audio file as recorded, ie without any attenuation. If you set the level to -75 or lower then SCS treats this as -infinity, ie silent. You may also enter this as -INF.
Pan: The pan controller sets the stereo position of the sound. The setting of the controller is also displayed and is enterable as a number, where 0 is left, 500 is center, and 999 is right. The Center button is enabled if the current value is not 500 (center). Clicking this button sets pan to 500 (center).
|
Tip: If you want to make fine adjustments to the level or pan, left-click the slider and then use the left-arrow and right-arrow keys as required. When you left-click the slider the background color of the slider will change to your Windows color scheme's selected item color (probably blue). This indicates that the slider has focus so keyboard actions like left-arrow and right-arrow are processed by that slider. |
Level Envelope
For information on creating and maintaining a 'level envelope' within an audio file cue, see Level Envelope.
Linked Files
Linked cues or sub-cues are started, paused, and stopped simultaneously, and SCS also keeps the cue positions in sync if you manually reposition the cues.
•The audio/video file cues or sub-cues are set to start simultaneously,
•The length of the cues or sub-cues are EXACTLY the same, and
•The 'Start At' times of the cues or sub-cues are EXACTLY the same.
The same file may be used in all instances, or you may use different files provided they have the same length.
See Linked Files for details.
VST Plugin
For information on using a VST Effects Plugin with an audio file cue, see VST Plugin.
Gapless Playback
For information on gapless playback when auto-starting an audio file cue immediately after the end of another audio file cue, see Gapless Playback.
Normalization
If you want to 'normalize' the audio levels of a number of Audio File Cues you can do this using Bulk Edit.
|
Testing your Audio File Cue You can test your Audio File Cue or Sub-Cue using the controls available in the 'Test' panel. Just press the play button to start the test. You can also use the other transport controls as required. Note that keyboard shortcuts are available for Rewind, Play/Pause and Stop. The default shortcuts are F4 (Rewind), F5 (Play/Pause) and F6 (Stop). The slider alongside the transport controls shows the progress of the cue. You can also use this to reposition the cue at any point. If you want to make fine adjustments to the position, left-click the slider and then use the left-arrow and right-arrow keys as required. |