Playlist Cues
Playlist Cues are available with SCS Standard and higher license levels.
Overview
Playlists are designed for pre-show and intermission music, but there is no reason why you cannot use them for any cue or sub-cue that requires this functionality. A typical playlist for pre-show or intermission music will contain several audio files, with more than enough music to cover the pre-show or intermission time. With a playlist you can play the tracks (ie files) in the playlist for as long as you need to, and then when the show is about to start or re-commence after intermission, you activate an SFR cue to fade out the playlist wherever it is up to.
Adding a new Playlist Cue or Sub-Cue
On selecting the toolbar button or option to add a new Playlist Cue or Sub-Cue, an Audio File Selector window will be opened to enable you to select the files for the Playlist. If you Cancel from the Audio File Selector then the Add Playlist operation is also canceled.
|
Tip: If you do not yet have the audio files you want to use for the cue then you can create a Place Holder for the Playlist cue. To do this, simply select Cancel in the File Selector, and you will be asked if you want to create a Place Holder, so just click Yes. This will create an Playlist Cue which can be 'played' just like any other playlist cue, but will, of course, immediately complete as there is no file selected and the duration of the cue is 0.000 seconds. When you are ready to assign audio files to this Place Holder cue, simply click the first Browse (...) button to select the required file(s). (If you Cancel the File Selector and then click No when asked if you want to create a Place Holder, then the Add Playlist Cue operation is also canceled.) |
Viewing or Changing a Playlist Cue or Sub-Cue
To view or change a Playlist Cue or Sub-Cue, just click on the relevant node in the Editor's Cue List.
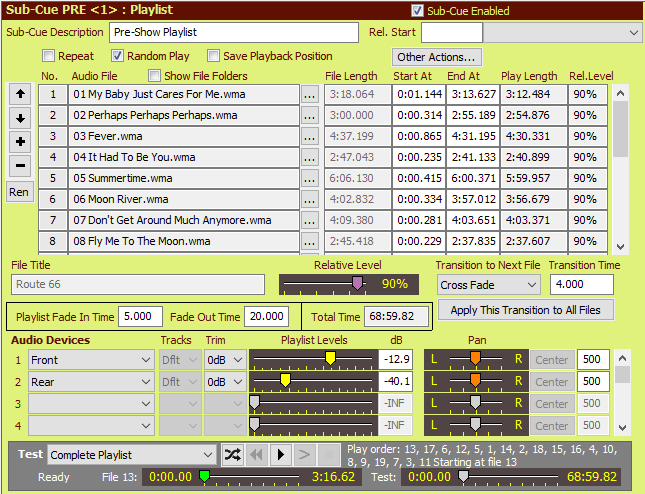
When you have added or selected an Playlist cue or sub-cue, a sub-cue panel like this will be displayed:
Properties and Controls
General
Description: Enter a description for this sub-cue. You can leave this field blank and let SCS create a default Description for you.
Rel. Start Time (Relative Start Time): These fields are available for every type of sub-cue. For details see Rel. Start Time under Audio File Cues.
Repeat: Tick this checkbox if you want the playlist to loop back to the start when it reaches the end. Note that with an SFR Cue you can cancel the Repeat, so that the cue will complete at the end of the current cycle.
Random Play: Tick this checkbox if you want random play of your playlist. The random order of play is set when the cue file is loaded, or whenever you re-tick this checkbox, or whenever the shuffle button in the transport controls is clicked. However, see also Save Playback Position below.
Save Playback Position: This checkbox is included primarily to support lengthy playlists which are played frequently (eg daily) and where you want to minimize the likelihood of individual tracks being repeated too soon. Here are the effects of selecting this checkbox:
|
Save Playback Position: For a Playlist that has this property set: •When SCS is closed (or the cue file is closed) then the number of the final track that was played is stored for this cue in the Production database. •When this cue file is next opened on this computer then SCS will retrieve that track number and prime the playlist cue to start from the following track number (ie to start at the beginning of the next track). •If Random Play is selected then the current play order is also saved in the database, and is retrieved and used when the cue file is next opened. •If Repeat and Random Play are both selected then when the end of the current play order is reached then SCS re-randomizes the play order, but in the new play order SCS ensures there is a minimum gap of 50% of the track count between successive selections of each track. For example, if the last track in the current order is track 17 and there are 50 tracks in the playlist, then in the re-randomize SCS will not re-select track 17 until at least position 25. (Note that this re-randomize at the end of the play order only occurs when Save Playback Position is selected, in addition to Repeat and Random Play.) A limitation of the re-randomize of the play order is that it is not possible to apply a transition such as a cross-fade from the last track of the current play order to the first track of the new play order. This is because SCS allows the Playlist to end after the last track is played, and then re-randomizes the play order, resets the cue to point to the first track in the new play order, and then resumes playback. This should all happen 'instantly', but it prevents the use of cross-fades etc at the end of the play order. |
Other Actions: Clicking this button will display a menu list of actions you can apply to either individual tracks or to the entire playlist. Normally you would only use these actions after you have selected all the files you required in your playlist as the menu actions examine the files are then apply changes where necessary to fields like the start, end and relative levels. The menu choices are not remembered, so adding another file to the playlist cue will just be added with the default settings (eg blank start and end times). These following actions are available:
•Trim complete silence from the Start and End of the SELECTED file: Sets the 'Start At' and 'End At' times by trimming silence from the start and end of the currently-selected file.
•Trim all below -75dB/-60dB/-45dB-30dB from the Start and End of the SELECTED file: Sets the 'Start At' and 'End At' times by trimming audio below the selected dB level from the start and end of the currently-selected file.
•Reset the Start and End times of the SELECTED file to their initial values: Resets the 'Start At' and 'End At' times to their saved values, for the currently-selected file.
•Clear the Start and End times of the SELECTED file: Clears the 'Start At' and 'End At' times for the currently-selected file.
•The next few actions are the same as the above, but for ALL files currently in the playlist.
•Adjust Relative Levels to apply Peak Normalization across ALL files (Max 100%): The purpose of this is to assist in providing a playlist of uniform volume regardless of the levels of your files. If you have files sourced from different CD's etc then they could well have differing levels. Selecting this menu item will cause SCS to compare the maximum peaks of all files currently in the playlist. The file(s) with the lowest maximum will have their Relative Level set to 100%. Other files (that have higher maximum peaks) will be assigned lower Relative Levels, so that when played back the maximum peak of every file will be heard at the same level. Please note the following: (a) Peak Normalization adjusts Relative Levels based on the highest sample value - it does not take into consideration the apparent loudness of the audio file; (b) SCS does not consider the 'Start At' and 'End At' times when scanning for a file's maximum peak - the entire file is always scanned.
•Adjust Relative Levels to apply Peak Normalization across ALL files (Max 90%): As above except that the upper limit is set to 90% instead of 100%, which enables you to manually increase individual relative levels above the upper level, eg to increase a file's relative level from 85% to 95%. You would not be able to apply such an increase if the upper limit was set to 100%.
•Adjust Relative Levels to apply Peak Normalization across ALL files (Max 80%): As above except that the upper limit is set to 80%.
•Remove ALL files from this Playlist: This is useful if you are building a new show's cue file from an existing cue file and want to change the pre-show music Playlist.
Note that scanning a file normally occurs only once as the scan results are stored in a database table. As mentioned before, SCS does not remember any menu choice you make - these actions are just apply changes where applicable to other fields. You can subsequently change the values in any of those fields if required.
Audio Tracks
This table contains the audio files to be included in the playlist. They are referred to as 'tracks', so a playlist with 8 audio files contains 8 tracks.
Audio File: This will contain the path name of an audio file to be played. The ... (browse) button can be used to locate a required file. In the Audio File selector window you can choose multiple files, and these will be inserted in the playlist at this point. See also Drag and Drop for details on how files can be dragged from an external application.
To change the order of the tracks you can use the up and down arrows to the left of the list.
To remove a track, click the 'minus' button to the left of the list
To insert a track before the currently-selected track, click the 'plus' button to the left of the list.
To rename the currently-selected, click the 'Ren' button to the left of the list. This will open the Rename File window.
File Length: This display-only field shows the duration of the audio file.
Start At: If you do not want to start the track from the beginning of the file, enter the time at which the track is to start. This can be to 3 decimal places of seconds. For example, enter 12.5 to start the track 12.5 seconds from the start of the file. Leave blank to start at the beginning of the file. (See also Other Actions above.)
End At: If you want SCS to stop the track before the end of the file then enter the time at which you want the track to stop. This is the absolute time within the file, not the required time after 'Start At'. Leave 'End At' blank to let the track run until the end of the file (or until you stop it). For example, to get SCS to stop playing the track at the 15.45 seconds time with the file enter 15.45 in the 'End At' field. (See also Other Actions above.)
Play Length: This display-only field shows how much of the audio file will be played, based on the 'Start At' and 'End At' where set. The range of the progress slider for this track is set to the Play Length.
File Title: When you open an audio file SCS will examine the file and display the title if found, Otherwise SCS will display a title derived from the file name.
Relative Level (%): As different audio files can be recorded at different levels, this fader gives you a chance to adjust the level of an individual track, making it louder or softer than the others. The default setting for this fader is 80%, so by default you have headroom available for increasing the level of a track. (See also Other Actions above regarding Peak Normalization.)
Transition to Next File: This defines how the playlist is to go from this track to the next track in the playlist. Options are
•None: No 'transition' is required, and that when this track has completed the next track will start, with no cross-fade, etc.
•Cross Fade: This track will fade out and the next track will simultaneously fade in. The duration of the cross-fade is specified in the Transition Time field.
•Mix: This is like a cross-fade in that the next track will commence before this track has ended, but the tracks will not be faded out or in. This is suitable for music tracks that have their own fade-out. The duration of the mix is specified in the Transition Time field.
•Wait: This provides for a pause between tracks. A CD player will normally provide a 2-second or more pause between tracks, and this 'Wait' transition type enables you to emulate this in a playlist. The duration of the wait is specified in the Transition Time field.
Apply This Transition to All Files: The information you have just entered sets the transition between this track and the next track. If you have significantly different start and end characteristics in the various tracks you have selected for your playlist, you may want to individually set the transitions for each track. However, if you want to use the same transition for all tracks then having set a transition type and time, click this button. The button is disabled if all the transition types and times are already the same. It is recommended that you do use the same transition type and time for all tracks, especially if you use random play.
Playlist Fade In Time: Enter the time in seconds (eg 3.5) that you want the playlist to fade in with. Leave blank if no fade in of the playlist is required. This fade in time is also used when resuming a hibernated playlist unless the SFR cue that activates the resume has a 'fade time override' set.
Fade Out Time: Enter the time in seconds (eg 3.5) that you want the playlist to fade out over when an SFR cue is activated to fade out this playlist cue. The cue will be marked as 'completed' when the Playlist Fade-Out has ended, and any unplayed files in the Playlist will be discarded, unless the SFR cue specifies hibernate, in which case the playlist cue will be marked as 'hibernated' and any unplayed files in the Playlist will still be available when the Playlist is resumed.
Total Time: This display-only field shows the total time of the playlist, allowing for cross-fade time etc to avoid double-counting.
Audio Devices
In this section you define which audio devices are to used by this playlist. It may be that you are just using a single mono or stereo output, in which case you will only need a single entry in this section. However, you can nominate additional devices up to the limit imposed by your SCS License level.
Audio device: The audio devices available are as specified in the Production Properties - Audio Output Devices.
Tracks: (SM-S audio driver only) This enables you to select the track or tracks to be played to this device. For details see the description of the Tracks field in Audio File Cues.
Trim: You should only need to use this control if your playlist is to be played at a low level and you are having difficulty setting the level using the Playlist Levels control. With the Trim control you can apply an overall reduction in the level of up to 50dB.
Playlist Levels: The level fader sets the level (volume) at which SCS will play the cue. The setting of the fader is also displayed and is enterable as a dB value. The maximum dB setting (loudest) setting is 0dB or +12dB, depending on the 'Maximum Audio Level' set in Production Properties - Run Time Settings. 0dB represents the level of the audio file as recorded, ie without any attenuation. If you set the level to -75 or lower then SCS treats this as -infinity, ie silent. You may also enter this as -INF.
Pan: The pan controller sets the stereo position of the sound. The setting of the controller is also displayed and is enterable as a number, where 0 is left, 500 is center, and 999 is right. The Center button is enabled if the current value is not 500 (center). Clicking this button sets pan to 500 (center).
Gapless Playback
For information on gapless playback between consecutive tracks of your playlist, see Gapless Playback.
|
Testing your Playlist Cue You can test your Playlist Cue using the controls available in the 'Test' panel. As a playlist can typically run for 20 minutes or more, SCS provides a way for you to check the transitions without having to listen to the entire 20 minutes or so. In the drop-down box next to 'Test' you can choose how much of the playlist you want to test. You can select Complete Playlist, First and last 10 seconds of each track, First and last 5 seconds of each track, or the Highlighted file only. If you select Complete Playlist or one of the First and last ... seconds... tests, then the test will start at the currently selected file. This is shown by the wording following Play order. Use the multimedia controls to play or stop the test. The 'File' slider in the Test panel shows the progress through the file currently being played, and the 'Test' slider shows the progress thru the test as a whole. You cannot currently drag these sliders yourself. Note that keyboard shortcuts are available for Rewind, Play/Pause and Stop. The default shortcuts are F4 (Rewind), F5 (Play/Pause) and F6 (Stop). Keyboard shortcuts are also available to Skip Back or Skip Forward 2 Seconds for each press of the keyboard shortcut. The default assignments are Shift+F8 (skip back) and Shift+F9 (skip forward). |