Live Input Cues
Live Input is only available with SCS Professional and higher licenses, and if you have SoundMan-Server installed. However, see also the section under Production Properties - Live Inputs on creating and testing Live Input Cues on a computer that does not have SoundMan-Server installed or loaded.
Overview
Live Input cues enable you to take audio from mic's, instruments or other live sources and control levels and panning through SCS. At run time you can also control gain and EQ via the Faders Window.
Adding a new Live Input Cue or Sub-Cue
Before adding Live Input cues you must have your Live Inputs specified in Production Properties - Live Inputs.
To add a new Live Input Cue, click the Cues button in the Editor's toolbar and select Add 'Live Input' Cue, or if you have Add Live Input Cue in the Favorites then just click that button. To add a new Live Input Sub-Cue, click the Sub-Cues button in the toolbar and select Add 'Live Input' Sub-Cue, or if you have Add Live Input Sub-Cue in the Favorites then just click that button.
Viewing or Changing an Live Input Cue or Sub-Cue
To view or change an Live Input Cue or Sub-Cue, just click on the relevant node in the Editor's Cue List.
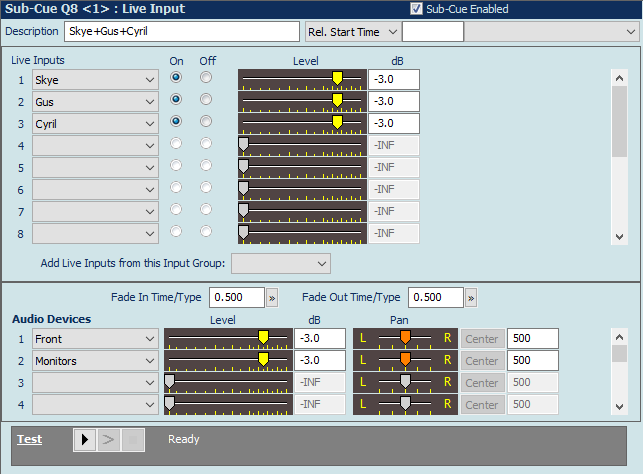
When you have added or selected an Live Input cue or sub-cue, a sub-cue panel like this will be displayed:
Properties and Controls
General
Description: When you select your Live Inputs, SCS will auto-populate the 'Sub-Cue Description' field as illustrated above. You can change the Sub-Cue Description field if required.
Rel. Start Time (Relative Start Time): These fields are available for every type of sub-cue. For details see Rel. Start Time under Audio File Cues. .
Live Inputs
In this section you select one or more live inputs to be controlled by this cue. Note that you can also add live inputs from an Input Group.
Live Input: Select a Live Input from the drop-down list. Live Inputs are set up under Production Properties - Live Inputs.
On/Off: When you select a Live Input then by default SCS assumes you are 'turning on' that input, so sets the On button. So in the above example, mic's for Skye, Gus and Cyril are all turned on (in SCS) and have levels set as shown. Now suppose a short while later, Skye leaves the stage. To 'turn off' (mute) Skye's' mic in SCS, set up another Live Input cue with just Skye selected, but select the Off button. When this second cue is activated, Skye's mic will be muted, but Gus and Cyril's mics will remain 'on'.
Level: This level fader sets the input level for this live input, and is similar in concept to a channel level fader on a sound desk. The level can also be set using the dB field. (The Level and dB are disabled if Off is selected.)
Add Live Inputs from this Input Group: This drop-down list enables you to add all the Live Inputs assigned to an Input Group. This provides a quick way to add multiple Live Inputs. This control is only used during editing - the specified Input Group is not saved with the cue, so if you subsequently add or remove Live Inputs from the selected Input Group then this has no effect on cues previously set up using that Input Group. As the control is just used to assist in selecting the required Live Inputs, the control is cleared immediately after adding the selected Live Inputs, so it is possible to then select another group. Any Live Input in an Input Group that is already assigned to this cue will not be added a second time. (Note that if you select the wrong Input Group then the Undo button is a quick way to remove Live Inputs you've just added!)
Time Fields
Fade In Time/Type: Use this field if you want SCS to fade in the live input cue. Leave blank if fade in is not required. For new Live Input cues the Fade In Time is initially set to the default value nominated in Production Properties - General. For example, to fade in the cue over 2.75 seconds enter 2.75 against 'Fade In time'. When you start the cue the level will build from no sound to the level specified by the Level fader(s) over the time specified (2.75 seconds in this example). SCS supports a few built-in fade curves. The default fade curve (or fade type) is 'Standard', which follows a linear track of the level faders. Other options include logarithmic and linear fades. A 'linear' fade is not the same as a 'standard' fade as the level faders are not linear across the entire range. To select a Fade In Type other than 'Standard' click the adjacent chevron button (»). A pop-up window will allow you to select the required fade type from a drop-down list. You can also enter the required fade in time in that same window, although this is just a replica of the Fade In Time field.
Fade Out Time/Type: Use this field if you want SCS to fade out the cue. Leave blank if fade out is not required. For new Live Input cues the Fade Out Time is initially set to the default value nominated in the Production Properties - General. For example, to fade out the cue over 4 seconds enter 4 against 'Fade Out time'. When you fade out the cue the level will fade to no sound over the time specified (4 seconds in this example). SCS supports a few built-in fade curves. The default fade curve (or fade type) is 'Standard', which follows a linear track of the level faders. Other options include logarithmic and linear fades. A 'linear' fade is not the same as a 'standard' fade as the level faders are not linear across the entire range. To select a Fade Out Type other than 'Standard' click the adjacent chevron button (»). A pop-up window will allow you to select the required fade type from a drop-down list. You can also enter the required fade out time in that same window, although this is just a replica of the Fade Out Time field.
Audio Devices
In this section you will define which audio devices these live inputs are to be linked to for this cue. It may be that you are just using a single mono or stereo output, in which case you will only need a single entry in this section. However, you can nominate additional audio devices up to the limit supported by your SCS license. Note that the Audio Device selection is not used if the cue is only being used to 'turn off' Live Inputs.
Audio device: The audio devices available are as specified in the Production Properties.
Level: This level fader sets the output level (volume) at which SCS will play the cue, after the fade in time if specified. The setting of the fader is also displayed and is enterable as a dB value. The maximum dB setting (loudest) setting is 0dB or +12dB, depending on the 'Maximum Audio Level' set in Production Properties - Run Time Settings. If you set the level to -75 or lower then SCS treats this as -infinity, ie silent. You may also enter this as -INF.
Pan: The pan controller sets the stereo position of the sound. The setting of the controller is also displayed and is enterable as a number, where 0 is left, 500 is center, and 999 is right. The Center button is enabled if the current value is not 500 (center). Clicking this button sets pan to 500 (center).
|
Note regarding Stereo Live Inputs: If you 'play' a stereo live input to a stereo audio output device then 'left' will play to 'left' and 'right' will play to 'right'. This also applies playing a stereo live input to multiple stereo output devices - 'left' play play to each output's 'left', and 'right' will play to each outputs 'right'. However, for mono outputs or for audio outputs with 3 or more channels, the stereo live input channels are mixed down to mono and sent to all selected outputs. |
|
Tip: If you want to make fine adjustments to the level or pan, left-click the slider and then use the left-arrow and right-arrow keys as required. When you left-click the slider the background color of the slider will change to your Windows color scheme's selected item color (probably blue). This indicates that the slider has focus so keyboard actions like left-arrow and right-arrow are processed by that slider. |
|
Testing your Live Input Cue You can test your Live Input Cue or Sub-Cue using the controls available in the 'Test' panel. Just press the play button to start the test. You can also use the other fade out button to fade out the live input (if you have specified a fade out time), and the stop button to terminate the test. |
See also: Faders Window